How I Printed My Putter
On this page I will show you how I 3-D printed my putter. I hope you take the time to watch the short video on this fun expirement. In just six minutes I demonstrate how I designed, printed, and assembled my putter. I used parts from old and unused clubs, and weighted it to make a perfectly face-balanced and vertically balanced putter.
There are a lot of face-balanced putters available today. They range in price from $200 to $500. And if you get a custom-fitting, you could pay well over $600.
Out of curiosity, I just wanted to see if I could do it. That is, actually make a face-balanced and vertically balanced putter. An experiment. But I also want to find out if having a perfectly vertical reference out on the putting green will help me read the slope and contour of the green more accurately.
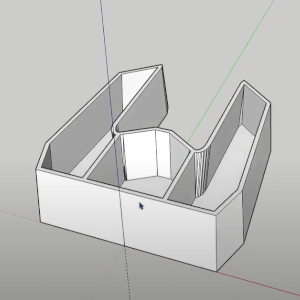
to provide space for weights
To provide space for the weights, the entire 3-d print needed to be hollow, then filled with weights and epoxy to achieve balance. The entire 3d print needs to be hollow, then filled with weights and epoxy to achieve the balance.
The face needs to have a four degree loft so the ball is lifted ever so slightly to minimize initial skid. I will use parts off of unused clubs, including attempting to remove an expensive Evnroll gravity grip from another club, to minimize the cost. Epoxy will completely fill all the voids, and a printed cap will enclose the putter.
I wanted the sides to extend back and parallel at the same width as a golf ball, which is 42.7 millimeters. Actually, the bottom will be less than the width of a golf ball and the sides will incline out away from each other wider than a golf ball. The intent is so I can use the back end to scoop up a ball without having to bend over and pick it up.
In order for the 3-d printer to make sense out of a model it needs to be sliced into layers. I loaded the model into slicing software then I took it to the printer. The 3-d printing process took about 14 hours. I slowed it down a bit to provide a better quality. I also printed the top and strike plate at the same time.
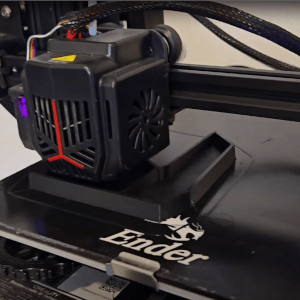
14 hours
My first attempt to extract a shaft from an old putter I got from thrift store was to cut the shaft off with a hacksaw. That didn't work well at all. I couldn't get through the steel shaft with the hacksaw. I gave up. Ended up breaking the hosel away from the putter. As an afterthought, I think this is better anyway. It provides more surface area for the epoxy to grip.
Before I glued the shaft into the 3D printed putter head I installed a three inch insert extension to lengthen the shaft a bit.
I clamped the shaft to the putter head at an incline of 70 degrees leaning in toward me, but vertically left and right.
I added the epoxy in layers. The first and second layers I thinned down a bit with fingernail polish remover - which is basically acetone. This makes the epoxy more runny, and it fills in and around the hosel nicely.
I put in a total of layers, the last layer was a bit thick and I did not thin it down with acetone so as a result the epoxy got hot and bubbled. But I don't think it will be a problem in this situation.
For the striker plate I found a strip of nickel in my workshop. I used a quarter to outline the left and right ends that I will cut away from the nickel plate. Once I designed the nickel strike plate I designed and printed a piece to hold it.
an Unused Club
For the putter grip, I really wanted to use the Evenroll gravity grip. I had purchased one about a year ago and put it on a chipper club. I'm not using the chipper anymore. I used Youtube to look up how to remove a grip without damaging it. I purchased the grip removal tool, and with some mineral spirits for lubrication, and a little effort, I was able to get the grip loosened and it slid right off.
With the grip removed from the chipper I was able to install it on the putter shaft. I added double-sided grip tape, lubricated the tape and the inside of the grip with mineral spirits and the Evenroll gravity grip slid right on.
I used coins to weight the sides (cheapest weights I could find). Each time I added weight, I added a layer of epoxy on both sides. I did this for several layers, each time checking the balance and adjusting the next weight placement. Eventually I was able to fill the epoxy to the top and add the cap.
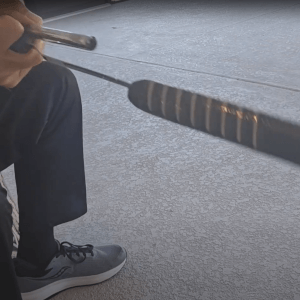
The cap is just a 4 millimeter vertical extension of the model. I added some 2 millimeter deep by 2 millimeter wide grooves, which I willed with white paint. The purpose, of course, is to help with aiming alignment.
I used some water-based white paint with a tiny brush and carefully filled in the grooves. When the paint was completely dry I went over the white paint with clear nail polish several times to completely seal the water-based paint in.

Using it on the course
It took four days to complete the project. First I tested the putter on my Ballflight simulator. I tested with a stroke I know goes about 12 to 14 yards. It seemed to give me similar distance control. Next I went to a practice green. Actually I am pleased with its performance so far.
Now I've used it on the course several times and it's turned out to be a fun conversation starter at least. But I do think it's a little easier to aim, but I have noticed that I have to be careful to hit it in the center in order to get a consistent roll. I lose distance with off center hits. That is probably true but maybe to a lesser extent with commercial putters.
Well, it was fun to build. I hope you enjoyed this experiment.
Check out the 6-minute video for the coplete story.